
Awesome Workout Tips – Part 2

By Jim Smith
In the first installment of the Awesome Workout Tips series, we focused primarily on the bench press. For today’s article, our goal is to get better at deadlifts.
Getting better means that we are able to setup in a better position before we pull, and once we get setup, generate as much tension as possible. This will allow us to pull heavier weights – which means more strength, more power, and more muscle mass.
While bad deadlift technique is notorious for viral videos online and messing up your back, learning the deadlift the right way can bulletproof your entire body and become a key foundation and component of your training program.
But Rome wasn’t built in a day and perfecting your individual deadlift form can take years of consistent practice. A smart and step-wise progression will allow you to dial-in your technique, at your own pace, while you work on your individual restrictions and weaknesses.
Let’s get started.
Workout Tip #1 – Earn the Right to Pull Off the Floor
When I’m working with a client, deadlifts are an exercise that take a lot of preparation. I would never allow a new athlete to start off with deadlifts or use deadlifts until I was absolutely sure they were ready.
I need to make sure that they understand what a hip hinge is – a hip dominant movement where the torso is straight, knees slightly bent, and the hips are driven backwards – and that they have the proper mobility and stability to be in control of the lift completely through the full movement.
One of the best movements I’ve ever found to progressively teach the hip hinge and perfect your deadlift – even before touching a barbell – is the kettlebell deadlift.
The kettlebell deadlift teaches the athlete to actively sit back into a hip hinge, brace their core, engage their lats, and load and strengthen their posterior chain. It really is a killer exercise.
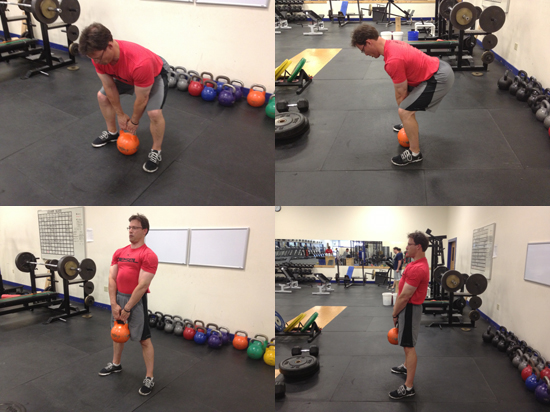
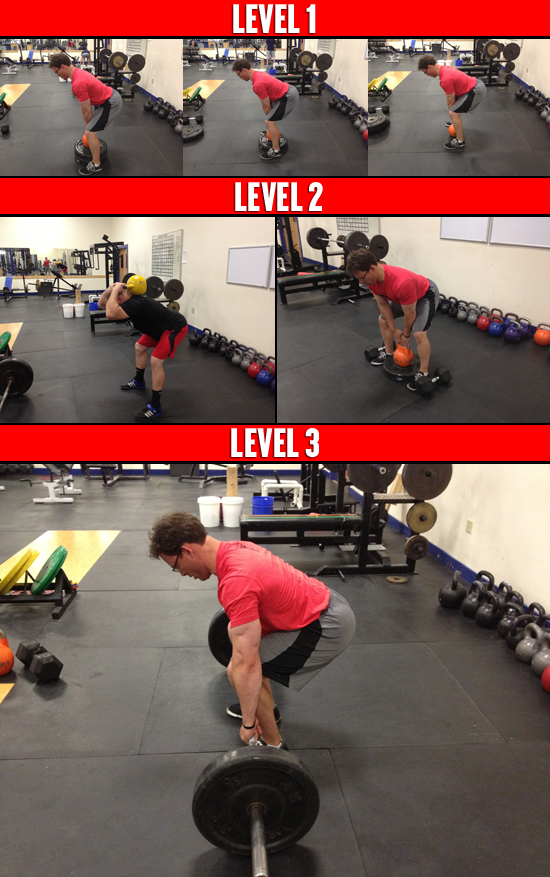
Like the barbell deadlift, I like to teach the kettlebell deadlift with a top-down training progression. This means, we don’t start with the kettlebell on the floor, we start by elevating it on two 20kg plates. As the athlete’s movement and control improve, we lower the kettlebell to one 20kg plate, and finally, the athlete will pull the weight off the floor.
Once the athlete develops proficiency with a one kettlebell deadlift, then they can be progressed to two kettlebells – one in each hand – and overload the same progression again.
Here is a very simple kettlebell deadlift progression I like to use when teaching someone new to deadlift:
One Kettlebell Deadlift
Weeks 1-2: KB Deadlift off of 2 - 20kg plates x 3-4 sets x 8-10 reps
Weeks 3-4: KB Deadlift off of 1 - 20kg plate x 3-4 sets x 8-10 reps
Weeks 5-6: KB Deadlift off of the floor x 3-4 sets x 8-10 reps
Two Kettlebell Deadlift
Weeks 7-8: KB Deadlift off of 2 - 20kg plates x 3-4 sets x 8-10 reps
Weeks 9-10: KB Deadlift off of 1 - 20kg plate x 3-4 sets x 8-10 reps
Weeks 11-12: KB Deadlift off of the floor x 3-4 sets x 8-10 reps
Week 13: Barbell Deadlift
Weeks 1-2: Kettlebell Deadlifts from Two 20kg Plates

Weeks 3-4: Kettlebell Deadlifts from One 20kg Plate
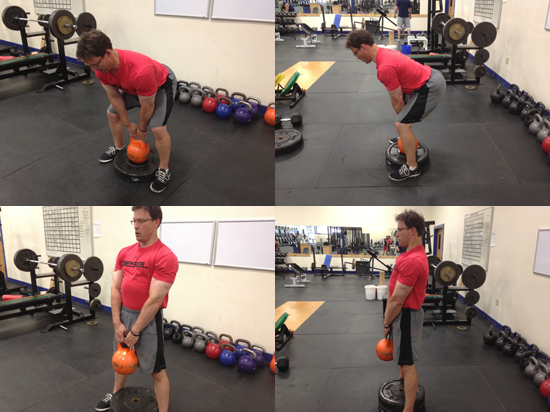
Weeks 5-6: Kettlebell Deadlifts from the Floor
Workout Tip #2 – Sit Back to Load Up
In my How to Deadlift article, I talked about why learning how to hip hinge to the bar is so important. It loads tension on the posterior chain, sets your core in a good position and with a powerful ‘brace’, and improves your mechanical advantage off the floor.
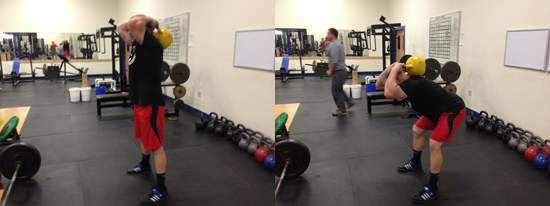
If an athlete has a tough time ‘getting’ the hip hinge – they’ll typically squat down instead of driving their hips back – kettlebells can be used in a different way – enter the kettlebell good morning.
By placing a kettlebell on the upper back, the athlete has no choice but to sit back – called a posterior weight shift - because if they don’t, they are going to fall head-over-heels on their face.
Kettlebell good mornings also strengthen the hamstrings and glutes, two key muscle groups that are typically weak on everyone and needed for a powerful deadlift.
Please note, for kb good mornings, the knees are not locked out, they are flexed 5-10 degrees. The torso should also remain as straight as possible, so only hinge back as far as you can without losing this position.
Workout Tip #3 – More Tension Equals More Strength
In another article, Best Deadlifting Tips, we talked about torque and tension. It is not enough to get into a good starting position, before any movement occurs, you have to create maximal full body tension. This can be accomplished for the upper body by pulling up on the bar and engaging the lats, and for the lower body, by driving the knees outward once you get the hips into position.
The perfect time to start teaching this full body tension and drilling torque at the hips is during their 12 week kettlebell deadlift progression. While the coaching cues, “spread the floor” or “imagine standing on a large piece of paper and tearing the paper” both work to get the athlete to understand how to drive their feet and knees outward as they descend into the hip hinge when initially grabbing the bar; some athletes need more help.
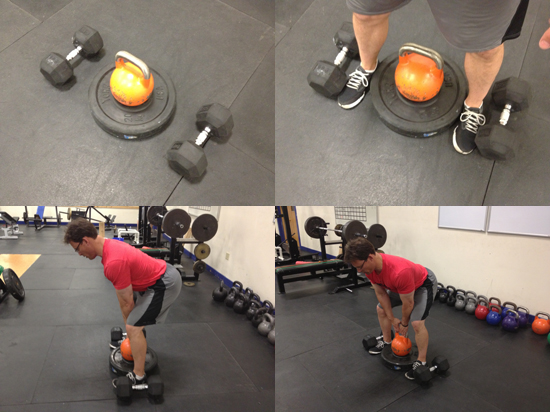
One quick way I’ve used with great success is to place heavy dumbbells on the outside of the athlete’s feet when performing a kettlebell deadlift and have them try to drive the dumbbells away. We only use this external cue periodically when an athlete needs some extra cueing, but trust me, it does work.
Putting It All Together
As you can see, teaching the deadlift isn’t rocket science but sometimes you do have to get creative to learn the right way to do it. Making sure you have the movement proficiency you need to deadlift and not get injured will pay off in the long run, because if you can start the exercise in a better position, you have a much better chance of staying in better positions through the entire lift.
I hope you enjoyed this installment of the Awesome Workout Tips series. I look forward to hearing your feedback after you try some of these techniques in your workouts. Please let me know in the comments what you would like me to answer in the next article.
REFERENCES
How to Deadlift – Comprehensive Guide
Deadlift 101 – How to Deadlift Better
Best Deadlifting Cues – These tips work!
Awesome Workout Tips – Part 1 – Get Better at the Bench Press
ABOUT THE AUTHOR
Jim is a proud Dad, strength coach, and entrepreneur. Co-author of the best selling Athletic Development Training system and co-founder of the CPPS certification for coaches, Jim has been recognized as one of the ‘most innovative coaches’ in the fitness industry. Jim is regularly featured in Men’s Health, Men’s Fitness, and Muscle & Fitness.
Website: http://www.dieselsc.com/
FREE Gift from Jim: http://www.dieselsc.com/free-stuff/