
Mastering the Pull Up


By James Cerbie
It was that time of year again. The time of year I lived for as an adolescent— the Presidential Physical Fitness Test.
If you're anything like I was as a child, ala overly competitive and highly energetic, you probably remember this test. It was the one time over the course of the year to lay your stakes as the most athletic kid in the class. Tests included things like the mile (which I hated), the sit and reach test (my greatest nemesis), push ups, sits ups and of the course….pull ups.
I'm not entirely sure how things turned out when I was 7, but I vividly remember my effort as an 8 year old. I had managed to pass the other tests with flying colors, and the only remaining obstacle in my way was the pull up.
I stood there evaluating the bar at the beginning of PE class (the best time of the week), eagerly waiting my turn. My name is called and I hop up on the bar—all I needed to do was 5 lousy pull-ups and I'd get one of those cool t-shirts signifying my supremacy.
As I completed rep numero three, I realized I was screwed: my muscles only had enough left for one rep. Sure enough I finish the fourth rep and hang onto the bar for dear life, attempting to will myself to the fifth rep. I probably started flinging and kicking like someone lit a fire beneath me, but to no avail. The fifth rep just wasn't going to happen (it probably didn't help that I felt the need to do a few warm up sets to show how cool I was).
I dropped down from the bar completely devastated and stormed off—and thus my obsession with pull ups began.
What Is A Pull Up (Sciency Stuff)?
Although this section will be a little more sciency in tone, it's important if you hope to ever master the pull up. You have to know what it's doing, what it's using, and where to feel it if you want to be successful.
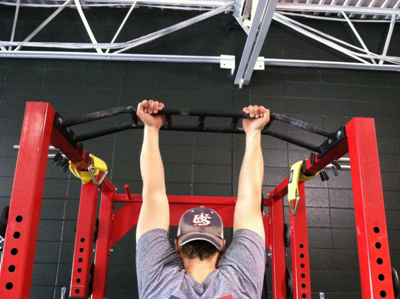
There are three different types of pull-ups based on hand position. First is the traditional pull up with your hands in a pronated position facing away from you:

Second is a chin up with your hands supinated and palms facing you:
Third is a neutral grip pull-up with your palms facing each other:

Each of these grips provides a slightly different stimulus, but we'll talk more about that in the "Where to Go" section.
A well-executed pull up is intended to work on the following:
- Shoulder extension
- Scapular retraction and depression
- Elbow flexion
- Stabilization of lumbopelvic positioning
And it does so by using big gun muscles like your lats, rhomboids, biceps, mid and lower traps, obliques, and rectus abdominis, just to name a few.
When you're doing a pull up, you should feel it in the following places:
- Muscles between, around and below your scaps
- Biceps
- Core (although this is a garbage term it's the easiest way to say your abs).
And you shouldn't feel it in any of these places:
- Upper traps
- Front of the shoulder
- Neck
With all of that in mind, I hope you can see why the pull up is such an awesome movement. It teaches you, first of all, to actually use your core. In the words of Shirley Sahrmann:
"The most important aspect of abdominal muscle performance is obtaining the control that is necessary to (1) appropriately stabilize the spine, (2) maintain optimal alignment and movement relationships between the pelvis and the spine, and (3) prevent excessive stress and compensatory motions of the pelvis during movements of the extremities."
Secondly, it builds tremendous upper body strength, power and size because it allows you to move a large load over a large range of motion and spend adequate amounts of time under tension.
Sounds like a winning combo if you ask me.
Technique
I think a lot of times it's easier to start with how not to do something. It goes back to the idea "you have to know how to do something wrong before you can really appreciate how to do it right."
Common Flaws
In particular, there are 4 major flaws I'd like to focus on.
1. Driving into extension:
Extension is necessary at times for power development, but this isn't one of those times. You should be able to do a pull up and maintain a "neutral" umbopelvic position.
This is particularly difficult with the pull up because of how big a role the lats play. The lat, if you didn't know this already, has distal attachments on the spinous processes of T7-T12, thoracolumbar fascia, iliac crest, and last 3-4 ribs. Thus, it's in a perfect position to drive someone into extension. In order to counteract this pull or stiffness, you need to fire, among other things, your obliques, rectus and transverse abdominis. In other words, you need to use your abs.
Although this may not seem like a big deal, the position of your lumbopelvic region has wide reaching effects. If that's off, it will make you more likely to commit the other mistakes below.
2. Reaching with your chin:
This goes for just about everything: keep a double chin. There's not a single movement where your head, chin etc. should be driving forward and up.
3. Humeral anterior glide and Scapular anterior tilt:
When it comes to keeping your shoulders strong and healthy it's all about maintaining position of the humeral head in the socket. When you pull your elbows past your body, or round your shoulders forward, you are not accomplishing that goal. You're merely cranking on the front of your shoulder and managing to avoid using the muscles the exercise is intended to use.
4. Flailing
I feel like this one speaks for itself. Just stop it.
How To Do It Right When it comes to pulling off a monster pull up, it all starts with the set up. Here's how to do it:
Now that you're set up here's what you need to focus on:
While maintaining a strong lumbopelvic position, initiate the movement by pulling your scaps toward their respective opposite butt cheeks. Once the scaps are set, think about pulling your elbows STRAIGHT down to your hips and pulling your chin over the bar. Once you reach the top (with chin packed, shoulders back, and "neutral" lumbar positioning) reverse everything you've done and lower yourself to the bottom.
In case you missed any of what we've gone over this far, here's a quick video tying it all together:
Where to Start
Congratulations. You're well on your way to becoming a pull up Jedi master. The only thing left to do is to actually perform the movement and start getting strong as (fill in word of choice).
If you're one of those people who jumps up on a pull up bar and remains motionless despite your best efforts, don't worry. You're not alone. Join the millions of people out there who want nothing more than the ability to perform one body weight pull up without any assistance.
Although it'd be cool if you could just will yourself to victory, it doesn't work that way. You have to start from square one and build up the strength necessary to perform the movement. Here are a few ways to go about doing that
1. Isometric Holds
It's well known that isometric exercise increases absolute strength and works within regional specificity—simply meaning it trains the angle at which you hold plus some (anywhere up to 15 degrees in both directions).
It's often a good place for people who can't perform the full range of motion but can do holds at different points throughout the range. As they get strong at one joint angle they often gain the ability to transition to other angles, and thus progress is made.
I'd recommend starting at the top and working your way down doing five 6 second holds separated by 10 seconds of rest for one set, and then perform anywhere from 5-10 sets.
2. Eccentrics
To quote Verkoshanksky and Siff: "It is known that eccentric exercise tends to produce greater and more rapid increases in muscle strength and hypertrophy than concentric exercise."
For someone who is struggling to perform a full pull up, that sounds like a good option to me. Get up on the bar and lower yourself as slowly as possible. You'll build strength and muscle mass that'll eventually help you do the real thing.
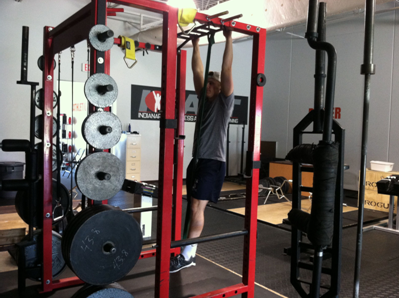
3. Band Assisted Pull Ups
Option 1 (preferred): Band on J-hooks:

Option 2: Band on bar:
No matter how much you play with the first two options, this is the moneymaker. You eventually have to be able to perform the movement in its entirety so you have to practice that way. It's just called specificity. Your nervous system has to learn how to appropriately coordinate the actions of all the different muscles, and the only way to accomplish that is via practice.
Start off with however much band assistance you need, and slowly begin to taper off as you progress from week to week. Eventually the band will disappear and you'll be doing real pull ups.
Where to Go
If you've reached this section, then I'm assuming you can do pull ups. Jumping up on the bar and cranking out 8-10 legit reps isn't really an issue for you. That doesn't mean it's time to neglect the pull up, however, but to get creative. You just have to experiment and find ways to challenge the movement beyond its normal demands.
1. Add weight
Hopefully this is obvious. The easiest way to make anything more difficult is to add weight to it. Hang weight off a belt, hold it between your feet, I really don't care…just add some weight and do work.
2. Play with the tempo:
Don't overlook the wonderful world of tempo training. As I alluded to earlier, isometric and eccentric training carry benefits specific to themselves. So why not mix concentric, isometric, and eccentric style training to really up the ante. For example, instead of just pulling yourself up and letting yourself back down, you could pull yourself up as fast as you can, hold at the top for 3 seconds, and then lower yourself on a 5 count. The combinations are honestly limitless, so play around and use tempo to your advantage.
While we're on the topic, here's a cool pull up challenge to try if you're feeling ambitious:
Do a pull up. Hold an isometric at the top for 3 seconds. Do 2 pull-ups. Hold an isometric at the top of the second rep for 3 seconds. Do 3 pull-ups. Hold an isometric at the top of the third rep for 3 seconds…and so on and so forth. Continue this cycle and see how many reps you can do before dropping.
3. Change the position of your feet
The most obvious example here is the dreaded L pull up: you hold your feet out in front of you at 90 degrees (making an L) and then do pull ups without losing the hold (what's up abs):
You could always play with having one leg up for a few reps and then switching to the other. Again, your imagination is the only thing holding you back.
4. Hand position
Recall from earlier the three different styles of pull ups: pull up (palms facing away from you), chin up (palms facing you), and neutral grip (palms facing each other). Although it may not seem like a big deal, changing your had position changes the demand of the movement. For example, you get greater recruitment of the biceps and pec major during the chin up, and greater recruitment of the lower trap during the pull up.
Either way, the hand position is an easy way to change the movement.
Hopefully this gives you a good idea of how to challenge yourself moving forward. You can change any one of the four variables mentioned above, or even get fancy and start changing multiple items with something like a tempo L pull up with 25lbs hanging off of you.
Closing Thoughts
Pull-ups are the bomb. There's no way around it. I love them as a coach and as an athlete (at least I like to still consider myself one) because they provide such an exceptional stimulus. I only love them, however, if you do them correctly. Just flailing around on the pull up bar doesn't count for anything. You have to approach it with a sharp focus to detail if you really want to experience the benefits.
When it comes to programming the pull up you have a few options. You can obviously go with the more popular option of 3-4 sets of 8-12 reps, but please don't limit yourself to that. I'm personally a fan of bumping up sets and dropping reps so you can perform the same total number of reps but do so with more weight. For example, instead of doing 3 sets of 8 reps I'd much rather do 6 sets of 3. I've found that leads to better gains in strength and size. Choose whatever works best for you and your goals though.
I hope you enjoyed the article, learned a thing or two, and are ready to crush pull-ups. Be sure to post any questions or comments you have below.
ABOUT THE AUTHOR
James Cerbie is a Certified Strength and Conditioning Specialist, Precision Nutrition Level 1 Certified, USA Weighlifting Sports Performance Coach, and Crossfit Level 1 Certified. He has worked with athletes from the middle school to professional level, powerlifters, olympic lifters, and Crossfit athletes alike.
He’s the owner of Rebel Performance and currently works as a strength and conditioning intern at Indianapolis Fitness and Sports Training.
P.S. He would also like for you to come hang out with him on Facebook and Twitter.
Facebook: https://www.facebook.com/rebelperf
Twitter: https://twitter.com/JamesCerbie